RESCUE BOARD FRICTION

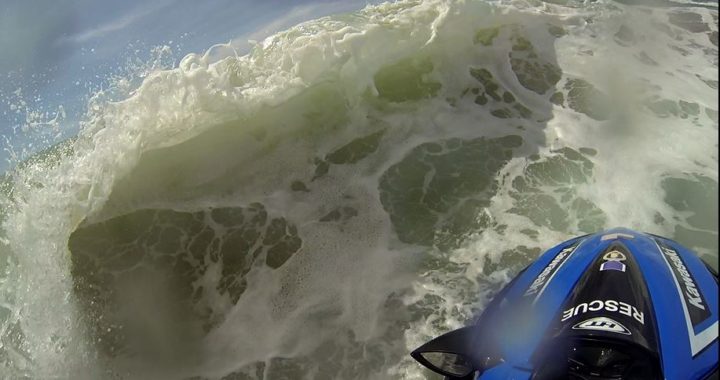
Unfortunately Rescue Boards (TAD-Towable Accessory Device) do more damage to our Rescue Water Craft astern due to vessel designs changing but the Rescue Boards designs are not adapting to the newer models. Do Rescue Boards work? Absolutely.

However, the use of these (TAD) Towable Accessory Devices have assisted in the recovery of many persons in distress and we are thankful for their utility.  Let’s take a look at considerations of repair and contact points.

Inflatable type designed rescue boards/sleds are not approved for Rescue Water Craft (RWC) safety use due to stability and connectivity.  This discussion refers to fixed core rescue boards that cannot be deflated.

It takes a lot of effort to maintain your Rescue Water Craft and Rescue Board. This requires of Public Safety Agencies to have effective training and proper inspection lists to note when Rescue Boards or RWC’s need to be removed from service due to safety maintenance or repairs.

Some models of Personal Water Craft (PWC) interface to the various Rescue Boards or Towable Accessory Devices (TAD) do not interface well with the variety of Rescue Water Craft (RWC) hulls from year of production, makes and models.

Please refer to the Rescue Water Craft Association recommended RWC’s for 2018:

Approved 2018 Rescue Water Craft

It is not an easy interface for sure!  Make sure you are watching the attachment points from each use and inspect your hull for wear through the top deck. This requires your RWC Operators to understand what to look for, why it is important and how to inspect and maintain their equipment before a mishap occurs from negligence.

This is especially true for NanoXcel hulls in comparison to fiberglass/gelcoat hulls. These lighter hulls tend to have more flex and the newer models have a concave top deck astern. This is also true for some Sea Doo models.


Will this cause harm to your Rescue Water Craft? What should you be concerned about?

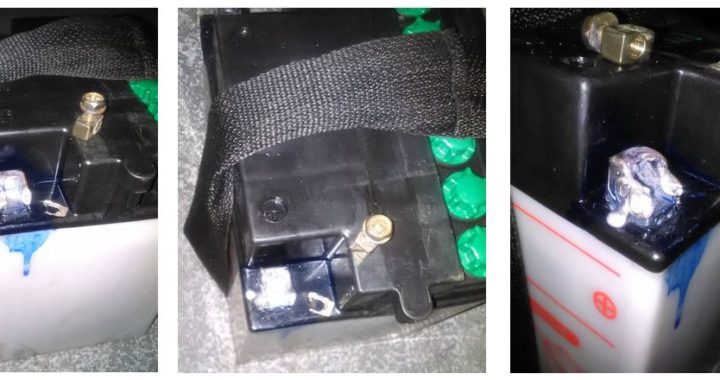
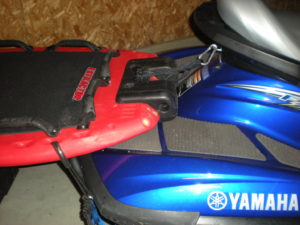
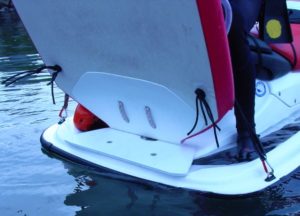
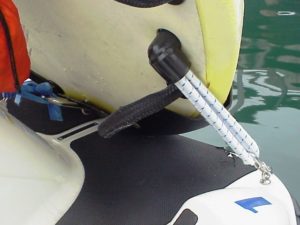
The center load bearing pressure point and the pivot from port to starboard along with how the Rescue Board is designed oftentimes do not have a complimentary fit. Problems may occur from compression indentations against the Rescue Board.  Remember, we are not permitted to drill only holes through the RWC hull and we cannot add any metal fittings on the top deck due to safety risk and liability.

Also take note of any entrapment from extension on port/starboard connector points of the Rescue Board, catch points and flexion caused by poor handle placement. These all lead up to contributing factors of friction and Rescue Board contact points to the RWC.

Think one word exclusively: PHYSICS

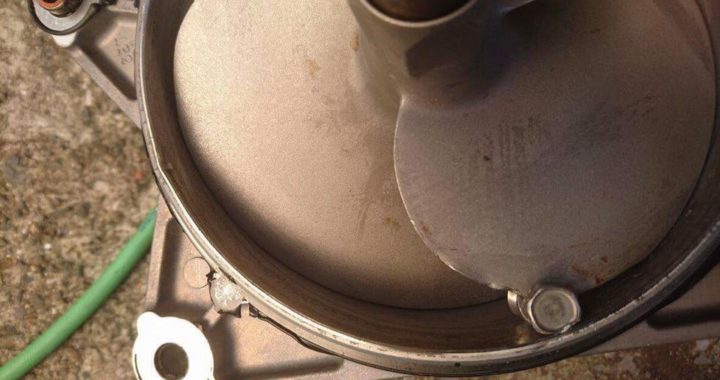
This means the pressure points from a rescue board are going to be pressed downward at the port/starboard sides and can wear completely through the top deck. This can result in a wear hole through the top deck surface


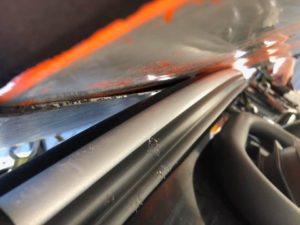
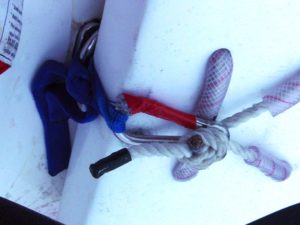
Bondline Molding damage and damage to contact point of the TAD Point of Contact

Remember: These are recreational Power Water Craft. They are not designed for Search and Rescue or Patrol work. They are designed for recreational activity use. (With the exception of the AlumaSki, Sea Doo SAR and RescueRunner which are occupational manufactured craft).

When you employ the use of a Rescue Board it will require of your agency effective ‘use, inspection and care‘ guidelines for liability and for safety underway. Failure to do so can result in loss of the Rescue Board, damage that cannot be repaired and budgetary needs for RWC maintenance and care. This can also lead up to agency liability issues.

Is this in your annual budget? Do you have maintenance repair items in stock ready to go?

K38 can help your agency set up your RWC program through professional consultation.


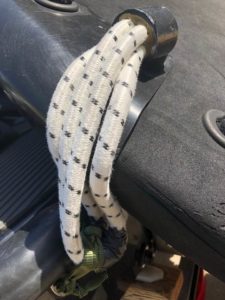
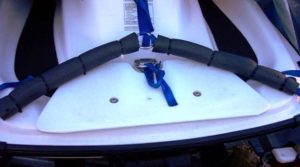
Friction points caused by the forces of action and unequal distribution of load, contact, drag or movement against he rescue board and the bond line or top stern deck.  Make sure inspections are thorough and replacement parts a readily available in your cache load maintenance gear.
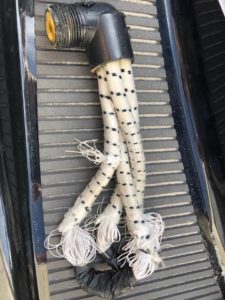
Rescue Board

You may need to alter the material on the stern deck to raise up the void between the two substrates. Refer to your warranty first before you proceed on any modifications and adhere to the guidelines and rules of the warranty.

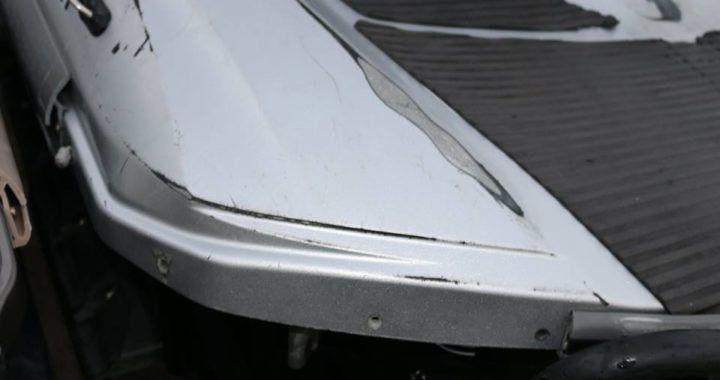
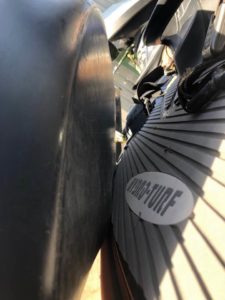
1.  Rescue boards can also pull off or damage the rail bond line or molding exposing the rivets. This can result in a safety hazard. Remove the RWC from service immediately if this happens.

2. Friction and impact can affect or damage the stern top deck or removable stern compartment covers on some models of RWC.

3. Re-boarding steps can be damaged or damage the underside of a Rescue board or cause a slight shock loading effect if the step makes contact on the underside of the rescue board and slides forward or back, this can result in issues with the center load bearing connector point.

4. Rescue Board friction pads or covers can splinter, break of fracture. They can even be ripped off the Rescue Board.
There are so many variables that come into play with physics and the actual weight load on the Rescue Board. Primarily it is the connective interface between the RWC and the Rescue Board that is most important.


Is your rigging causing harm or creating a solution? What are you willing to give up to gain?

There is no defining interface for rescue board use. It depends upon the make, model and year of production of RWC you have.

One thing is for sure, take some time to study the contact points, friction and how the Rescue Board is hooked up to the RWC to try to reduce the impending damage your RWC will suffer.

Shawn Alladio – 2018

Shawn cares most about her community and the culture surrounding the safety of event service providers and Rescue Water Craft operators, working hard and dedicated towards protecting their reputation, distributing safety information and continuing to train these amazing individuals to the highest standards of care.

Use at your own risk. Please take a qualified Rescue Water Craft training course and maintain proper records and respect all the PWC, RWC, PPE, and gear OEM manufacturer warning labels and cautions.

Become a member today of the Rescue Water Craft Association: JOIN THE RWCA

RESCUE WATER CRAFT BATTERY ISSUES

MELTDOWN

RESCUE WATER CRAFT BATTERY ISSUES

Rescue Water Craft batteries require your constant attention. Battery inspection needs to be a daily feature in your pre and post operations inspection.

It is only avoidable if there is knowledge. So now in the aftermath of discovery it is avoidable if the knowledge is retained. Before this it is just 'learning'.

That's a dead short you are looking at in the images above. It is the result of way too much current flow. How do you know that? The posts are molten where your cables would have been connected. That is one way to explode a battery, and could become a very dangerous situation quickly.

The Rescue Water Craft fuses should have helped to prevent an explosion. It would be important in these instances to inspect your fuses ASAP.

First off you need to refer to the make, model and year of production of your Rescue Water Craft and adhere to the manufacturer’s recommendations.

Questions
Is there too much slack in the lead wires or the battery strap harness inside the RWC while operating with this battery?

Is it missing the traction pad below it rests on? Is it the right type of battery?

Did this happen inside the Rescue Water Craft or was the battery brand new and being charged for use?

Jet Pump

Yuasa Battery

LOOSEY GOOSEY

Loose battery connections on the lead cables create resistance and turn into ‘heat’. If the cable was not tightened enough it could create resistance for the battery when it tries to bridge the gap and arcs with a high heat. There should be no white powder on the terminals and they should not move when touched and tugged to see if the posts swivel or move.

Tight terminals are a must, as are using an inspection daily check list post and pre-ops. Be consistent, its a bad deal when problems come your way when you are out on the water. It's better to catch them while the RWC is on the trailer. Don't splash your RWC until you are 100% seaworthy.

HINT: do not use a screwdriver, use a ratchet with a properly sized socket to adjust the Pos/Neg cables!

With a loose connection the wires which are small and the load is high, what does that mean? If a battery is loose inside a Rescue Water Craft, such as the straps are connected improperly or using the wrong strap sizes or one broke free or the battery size is wrong and does not fit into the stock tray, problems are imminent.

Take a close look at the battery tray location. Does your battery shape fit fully in the tray? If not, consider heading back to a stock battery, saving money is not gonna happen in this situation.

If the battery is the right size the straps may be problematic. Friction and movement of the battery can be an issue causing the wire connections to crack or fracture and this is the kind of a situation that can cause sparks. If the battery is bouncing around those sparks are like the same heat as an arc welder. A bad situation is at hand and fully preventable.

Or you could have a short inside the battery. Even a partial short and/or poor connection on the terminals can create significant problems. In these images it looks like the pos side had a meltdown.

This kind of a situation can create other problems such as the relay or starter motor engine could have experienced damage.

Jet Pump

Vents and Distilled Water

JUICED

Never jump a Rescue Water Craft from another running vehicle or charger, it will feed more amps into the system and can damage or destroy the MPEM or ECU units.

Also if jumping the battery, make sure you are using the right size cables, you need the smaller cables, larger ones will not correlate with the proper amperage, and would be a wasted attempt.

I would definitely inspect the fuse and the leads pos/neg cables for rust or corrosion. Sometimes this happens when people jump their RWC batteries off a vehicle that is running, which should NEVER be done. Our Rescue Water Craft are not set up to run the amps and voltage beyond 2.5 amps in their system, this can be very destructive.

There is not much difference in voltage between a nearly full battery and a depleted one, its less than 1.0 volts. If the RWC engine is running the charging system makes an attempt to maintain a specific voltage output to the battery. This depends upon the battery ability to absorb the charge translated as Amps and the charging system delivery of the full current the battery demands.

There is a lot of demand placed on a battery and its electrical partners; from the voltage, charging, stator alternator, solenoid and starter. Never jump your battery from a vehicle, you will overcharge the system. Stay under 2 amps while charging your battery.

A solenoid is an electrical switch which causes electrical contact from the starter circuit to ground power the coil and can handle the high voltage for the starter which begins the rotation of the motor. Solenoids make a distinct click sound. If you are jumping the battery and the solenoid cranks poorly then it’s not the solenoid, it could be just a bad connection.

You can check with a volt meter on the posts to get a reading. Then press the ‘start’ button and note if the voltage is lower. It may be a weak battery.

It is important to remember to protect the electrical system and the battery by not holding down the start button longer than 5 seconds and waiting 15 seconds prior to the next start.

Frequent starts will engage a quick shut down cycle on the battery if the engine cannot run. You don’t want to burn out your starter motor. Patience goes a long way and will help you understand the temperament of your RWC electrical system.

Don’t rush, take your time to troubleshoot and be patient.

Jet Pump

Waterproof Battery Tender

VOLTAGE

When the battery voltage drops low it’s time for a new battery. It is also possible to purchase a new battery that was not fully charged and it drops its voltage and becomes worthless pretty fast, requiring another new fully charged battery.

It is important to follow the directions for using the appropriate battery charger that can fully charge a new battery. Many times people do not follow suit properly and they waste time and money.

Waterproof battery tenders are often used for long time storage to help protect battery life. For some watercraft there are other contributing factors it could be a bad DESS key for a BRP Sea Doo as well. A simple replacement of the DESS key and coding might be the answer.

Always check a battery on a multi meter to see what the voltage level is. Make sure you are using the right battery that is recommended by the OEM manufacturer as well. Low voltage can be really bad for electronics and relays. Good batteries should be 12.3-12.5 volts but refer to your RWC brand to be specific.

Cheap batteries yield cheaper results and some of the batteries like Yuasa require a special charger to load the batteries, so that can be problematic and not getting a full charge. Use dieletric grease on the terminals in the future, you will be glad you did.

Rescue Water Craft batteries work best when the charge is maintained. Maintenance free batteries are highly recommended. Batteries get hot when working hard, so don’t overload the amperage by adding accessories to the craft that need an electrical draw.

Answer: Tight connections and Clean Cables are required, good straps and the appropriate fully charged battery. This was a brand new battery in the images above being charged.

Recap:
1. Bad Battery Sealed or Cell, gel cells or AGM (vented or not vented) Wet cell batteries need distilled water.
2. Poor Battery Connection-Partial short
3. Wrong Battery Used
4. DESS post failing (inductive arcing)
5. Fast Charged Battery
6. Inspect Fuse Box

This is not a tutorial, it’s a basic Q & A regarding battery connectivity. Take your RWC to a qualified mechanic for servicing and follow basic preventative maintenance schedules to ensure the longevity of your operations and underway safety.

Content Creator - Shawn Alladio cares most about her community and the culture surrounding the safety of event service providers and Rescue Water Craft operators, working hard and dedicated towards protecting their reputation, distributing safety information and continuing to train these amazing individuals to the highest standards of care.

RESCUE WATER CRAFT RESPONSE FOR KITES

Rescue Water Craft Kiteboarder Recovery

Kites, Wind, Water and You

May 21, 2018 - Just a reminder, not a formal tutorial.

Shawn Alladio

Photos: k38 Italia

Rescue Water Craft Response for Kites, some reminders and suggestions, however training is required to reduce liability at sea.

How will you use a Rescue Water Craft to recover a kiteboarder and their equipment?

Most Kite Boarders are well versed in self-rescue and the warning signs of their activity relative to others in the water. They will often use their kite as a sail and drag themselves back to shore (safety) to depower and deflate their rig. They may even be using their kite as a float an/or a sail to draw back towards shore under wind power.

Not all Rescue Water Craft operators or crew are well versed in kiteboard activity and recovery.  Usually the Kiteboarding community has designated areas with high wind capacity and times of day they enjoy their sport. There are a variety of skill levels and equipment uses.

Does your agency have a policy for contact with kiteboards and their gear?  Two things to consider:

  1. Water Based Response
  2. Shore Based Response

Ask yourself a few questions, are the winds light or strong and growing stronger?  What is the direction of the swell, the wave height and spacing, shoreline configuration, hazards and any background or nearshore traffic?

An able bodied kiter can have their kite laying on the surface with little power, sometimes this is because the kiter has brought it down intentionally.  They may have a tethered safety line they are using to recover their bar. They will loop their safety line along with handle of their bar while the other lines to the kite will have slack and it will not be able to fly.

They will continue on wrapping lines on the bar depending upon if they have 4 or 5 line bars.  It is a slow process for the athlete at times.  You will see the kite draw in closer and they will possibly grab onto it or lay on it and be drawn back towards shore. Determine if they are in close and okay. You may not need to intervene; observe body language. Sometimes things don’t’ work out as planned.

If you are observing a kiteboarder in the water, try to differentiate between an assist or a rescue, and possibly no response. It’s always good to conduct a safety check and maintain visual contact. For instance, they may be dragging themselves back to recover their board using the kite as a sail. There are many different behaviors of self-rescue and trouble situations kiters can get into, this is only one for reference.

Know the causes of runaway kites and potential injuries both on water and land not just to the athletes but to the responders and bystanders. There are a variety of reasons kite boarders have safety issues underway or during prep to launch or recover. Kite boarders can suffer joint and ligament, dislocations, traumatic injuries, fractures and back and neck injuries. It would be advisable to prepare for transits with these type of injuries in mind.

Kiteboarding Safety

Know the popular Kiteboard areas and observe the times they tend to launch and their behavior on your area of operation. Spend some time observing their normal body language and deployment procedures.

Visit a local supply shop and inspect the gear and become familiar with it. If you have a popular kite zone in your area, prepare in advance for those difficult situations. Sometimes you can aid a kiter who is landing on powering down the kite to bring it down. In those cases you can communicate verbally or with sign language.

Or go and talk to them, invite them to come to your agency and give a presentation; ask them questions about response in case of an emergency. Check out their kite rigs, personal protective equipment and harness set ups and how to release their kite and secure their gear.

Know the signs of a kit in distress vs a kiter just going through reset formations, there is a difference. There are a variety of injuries or suspect injuries you may encounter, so be prepared.

INDICATORS

Sunset is usually a higher risk time as thermals change with the heat/cooling effect. Out of control looping kites are a warning signal.

Remember lines can be submerged, never cross the path line of the kite location to the downed athlete with the Rescue Water Craft.

Approach the kite itself from upwind or up drift not downwind, never grab the lines.  Lines can wrap, and slice under a load and it happens quickly. Once pinned you are now part of the problem.

Hopefully the kiter has unhooked from the lines first. Sometimes with an unconscious individual or severely injured this is impossible. You will need to go to a Plan B real fast. Ask the kiter if they are free of their rig. Distance of lines to note are up to 25 meters or 75’. Many variables apply, so its up to your fundamental knowledge of water, weather, kites and survivor behaviors.

If responding with a Rescue Water Craft, you must maintain craft safety as a maritime asset. This means first you protect yourself as the operator and your crew, along with your Rescue Water Craft.

You do not want the filament lines to make contact with the helm or throttle lever, let alone personal contact, and be mindful these lines will sink.

Make a quick assessment; is the kiter exhausted, are they unconscious have they suffered a traumatic injury, are they panicking? What you see is your best determination and that can change quickly.

Make sure you have a minimum of 2 tourniquets on board your Rescue Water Craft. Our operational standard is 4 and we have them stowed inside a waterproof Pelican case.

At idle speed driving over lines you can consider the threat level of fouling your impeller to be ‘danger high’. So don’t do that.

Rescue Water Craft Approach

This is no easy task, consider the type of RWC you are using and your idle speed and athlete condition.

You may need to shut the Rescue Water Craft off and float/drag in the water alongside the athlete until a full recovery is made. Be mindful of which position your bow is in and subsequent threats under time and direction.

Stay clear of all filament lines regardless and do not grab the bar. Make sure you have your cutter ready with you in cases of an emergency.

If you are responding to a situation with a looping kite this one is tricky. It’s called the ‘death loop’. If you can make contact and deflate the kite that would be advantageous if a serious situation occurs. Remember two kites that are tangled, the athletes have no way to control the depowering of a kite.  You will see a spinning kite in these situations most likely.

Keep in mind with wind direction, velocity and athlete positioning they can get dragged and seriously harmed and you don’t want to become a part of that problem. Stay clear of the line of sight and line of drift, and think ahead!

Kites can impact others in the water such as swimmers, surfers or bodyboarding. They can run alongside piers or jetty walls or if offshore winds persist run away at sea. On land they can be menacing and deadly.

If nearshore grab the kite at the center bridge, along the leading inflatable edge if it makes it to land you may have to flip it upside down. Once again pull it downward rapidly and walk towards the tension of the lines against the athlete (if still tethered) and drag down to get the lift away from the inflatable bridge/sail.

MONITOR the Kite

Remember once a kite makes landfall there is a strong possibility depending upon wind conditions that the kite will pick up speed, you must act quickly and know what to do.

You need to know how to release the kite from an athletes harness at their midsection.  This can be very difficult with an unconscious survivor.  Typically you are looking for a red knobs to pull as a release (or cut the lines). Make sure the lines are not under tension and that you are both facing a positive direction relative to the wind.

Again be mindful of lines and their direct position to you, the Rescue Water Craft and the athlete. You may need to have several cutters as at this point. If you don’t have a safety tether attached to the cutter it’s possible to lose one overboard. Be mindful at this point of contact your own engine cut off switch. Secure it safely inside the chest opening of your lifejacket if you power off the Rescue Water Craft.

Approaches to the kite are best measured by contact with the leading edge of the inflatable bridge windward at approximately a 45 degree angle. Do you best to avoid the lines and keep a steady observation on the water and wind conditions surrounding the threat and athlete location.

MEDIATION

Immediately deflate the kite by identifying the location of the plugs.  Then in a lengthwise direction roll the kite and wind the filament lines onto the bar itself. Then return to the kiter location and assist in their recovery. Remember once again lines can wrap or snap or have already done this to the athlete.

Be mindful if you are heading towards shore or out to sea. Keep a watch regarding nearshore rip currents. Keep in mind that the kitesurfer may be pulling their lines in. Consider how much drift you will have from point of contact to boarding the kitesurfer and possibly their kit on your Rescue Water Craft.

Ensure you are mindful of when to power off the Rescue Water Craft. Ensure you have secured all the threat hazards. I like to use a 4 foot runner with a carabiner to put a fast lock loop around kite gear to help me with mobility and stowage. I usually have redundancy of these assets. These are to be considered to be disposable accessory devices. Make sure you have replacements readily available.

When you get underway you do not want to ‘wash away’ the kite gear. You can do this one qualified Operator of a Stage 5 category or a Stage 5 category crew. Secure the kite board, athlete. Do not operate above 25 mph under transit. Slow is Pro at point of contact!

At sea you will be setting the kite adrift (or it already is), so there is that secondary hazard for others and don't forget the length distance from athlete to kite.

There are a variety of quick releases usually marked red but not always.

Landing a kite: grab again at center bridge, make sure the inflatable bridge is lowered to the ground with skirts up and throw some sand on the flaps to weight it down probably 20-30 lbs. of weight.

Pull the inflator hoses, deflation valve or plug to depower the rig on land and stow it, watch out for those lines again.

You should all undertake specific training with these kind of rigs, watch those lines and be mindful of your water jet pump.

Upwind or Downwind

RECAP

Not a training aid, please refer to qualified certification programs and visit a Kiteboarding club or shop for further details and important information.

  1. Approach the athlete with the kite in front of them and the wind to your back on a 45 degree angle, or conduct a Johnny B Maneuver. (Draw an imaginary J with the bow of your craft to your point of contact either port or starboard side)
  2. Contact with the kite is best done at the center inflated bridge, hold on tight while maintaining your balance on the Rescue Water Craft and do not let go. Keep in mind the rotational forces of your Rescue Water Craft and any windage against both the hull and the kite itself.
  3. Approach the kite downwind at a 45 degree angle, you can also position and let it drift towards your line of direction and make contact broadside. Keep in mind you may be making contact on port or starboard side so refer to your best practices and operational functionality.
  4. Once you make contact with the kite and have the rig secured you can complete a full circle rotation keeping the lines to your inside turn so you don’t cross over them and bring the kite back to the athlete. They may be able to get underway again if the rig is okay and they have no injuries or exhaustion, talk to them and ask them how they are doing, visible signs of injury or panic take to shore
  5. (Situation Option) Or the kite must be deflated and the athlete may have already have packed down, or the kite could be drawing free in the direction of the wind. Often a kite boarder will use their harness to wrap a deflated kite into a bungle for transport. Kites can be lethal if unsecured so keep it low to the water/ground and deflate.
  6. Your ending is the most important part, slow steady stable transport and a calm ending for transfer to shore, keep your bow out to oncoming wave energy or your bow towards shore in large bodies of water.
  7. Power down your Rescue Water Craft once you are in 2.5 feet of water

Reference Video:

https://www.youtube.com/watch?v=hOjMA9a0rSc


WE RECOMMEND OCEAN RODEO DRYSUITS
Check them out for drysuit comfort and safety underway. This is an outstanding company that has a pedigree in kiteboarding.

Ocean Rodeo

Photos: K38 Italia

Content Creator - Shawn Alladio cares most about her community and the culture surrounding the safety of event service providers and Rescue Water Craft operators, working hard and dedicated towards protecting their reputation, distributing safety information and continuing to train these amazing individuals to the highest standards of care.

TRIM IS THE ANSWER

RESCUE WATER CRAFT TRIM

Let's consider how we are to determine a level and stable Rescue Water Craft trim capability.

It's not just the mechanical advantages that some make, models and year of production Rescue Water Craft have, sometimes it is simply operator knowledge or the lack thereof.

The pump plays a vital roll in trim and balance. Why? Because the Rescue Water Craft levels out easier under power than in a standing position where the likelihood of capsizing or falls overboard increases.

The type of water and the water conditions are a big part of the story.
How will we determine our specific Personal Water Craft jet pump maximum efficiency? Are you noting the type of water conditions?

1. Saltwater
2. Freshwater
3. Waves
4. Swell
5. Wakes
6. Current
7. Calm Water
8. Turbulent water

Operators and administrators or teams may ask; how can I increase my trim function, pump efficiency and forward movement or maintain a level steady boat of speed?

Water action and shifting weight.........

STEADY AS SHE GOES

That is not an easy question to answer. It requires introspection of several elements:

1. Helm and Throttle Control
2. Mindset of the Operator and their knowledge base, including vessel familiarity
3. Vessel type and specifications
4. Fundamental knowledge of trim packages/capabilities
5. Effective knowledge of environmental factors
6. Weight, drag, thrust and hydro dynamic affects
7. Directional turns
8. Wear and tear and replacement or preventative maintenance and inspection
9. Type of rescue board (Towable aquaplane device) and its attachment policy

As you can see, trim is a variety of technical advantages or disadvantages and it all leads up to the Operators.
Rescue Water Craft Operators are responsible for the safe transport underway and to deliver a level, steady and stable boat.

Don't rock the boat!

BALANCE IS THE POINT

Trim is essentially dependent on all of the above for consistent efficiency. It is also dependent excessively on operator knowledge of when to modulate the throttle for acceleration and deceleration from the changing phases of:

1. Displacement of water against the hull
2. Planing speed
3. High speed turns
4. Low speed turns

Hull Types
1. Flat Bottom
2. Semi-V
3. Deep V

There are a variety of variable trim systems for personal watercraft depending upon:
1. Make of Personal Water Craft
2. Year of Production
3. Model
4. Two Stroke/Four Stroke engine

Take a Course with us and discover your operational success. We are ready to take you to the fastrack of professional
operations by assisting you in your technical Rescue Water Craft Qualification.

Is Cavitation the Problem with your Jet Pump?

FLOW

Jet pump cavitation is oftentimes confused with the effects of ventilation regarding Personal Water Craft jet pump efficiency. For occupational operators this is a topic of interest for RWC use. We are looking at several aspects of jet pump security:

1. Aerated water conditions are Rescue Water Craft would operate in such as a surf zone or whitewater in a river
2. Damage to the jet pump unit and its components

Our Rescue Water Craft cavitation occurs when the results of extreme reduction in jet pump pressure on the back side of the impeller blades. This creates a loss of water jet pump pressure.

We enjoy two types of constructive materials for impellers, aluminum and stainless steel

Jet Pump

PWC Water Intake Screen missing bolt

Rescue Water Craft Cavitation

It is an interesting process that we cannot see while operating our Rescue Water Craft. We can feel the hesitation of the craft, loading up or stalling of the RWC as throttle modulation is applied at the helm. This is most apparent in white water operating conditions. Or if there is debris that is hung up on the water intake screen or beginning to ‘wrap’ around the driveline.

Water begins to boil at 212 degrees Farenheit. If we reduce the atmospheric pressure low enough, water can also boil at room temperature. These boils can effect jet pump efficiency underway.

As the Rescue Water Craft impeller begins turning through the water drawn into the jet pump at an ever-increasing rate of speed, the pressure on the back side of the blades is reduced, and if that pressure is reduced low enough, the water will begin to boil and form water vapor on the blades. This usually occurs near the outer or leading edge of the blade. There can also be damage to the jet pump guide veins on the backside of the impeller.

Jet Pump

Inspect your PWC Water Jet Pump for Debris

FLOW DON'T BLOW

Water vapor bubbles will migrate closer to the center of the RWC impeller blade within the Jet Pump. This is where the jet pump pressure is higher, and the boiling stops. The vapor bubbles will begin to implode against the impeller blade's surface.

This resulting energy release can be so strong that it can begin a process of chipping away at the impeller blade surface, leaving what is called a cavitation burn.

Cavitation can have a lot of different causes. Impeller nicks, dents or different types of damage to the leading edge of any of the impeller blades are often the highest contributing factor. If your Rescue Water Craft impeller no longer cuts through the water smoothly from the water drawn through the water jet, it will cause disturbances in the water flow, and this can result in the effects experienced from cavitation.

Ventilation can occur from the bottom hull of the Rescue Water Craft. At each training course or rescue episode we pre and post-inspect the bottom of the hull for any nicks in the gelcoat or substrate surface.

One of our inspection requirements is to check out the water intake screen, the pump tunnel, ride plate, impeller (both lead and trailer blade edges), pump guide veins to ensure there are no cracks, chips, breaks or scores. We also inspect the pump liner and are sure to fresh water flush after each use.

Typically the keel leading up to the dead rise of the bow is a key area for gelcoat damage from repeated groundings. Chines can catch the edge and fleck off small areas of gelcoat. Ventilation can be suspected to affect the jet pump unit if that area has any surface damage.

Jet Pump

Inspect your PWC Water Jet Pump Intake Screen for Debris

TRACTION IS SAFETY

Repeated groundings can change the blueprint of the hull bottom. It can cause a grinding away of the centerline of the keel. Not all agencies have the luxury of using boat ramps and trailers. Some must ground their RWC which results in the keel becoming misshaped over time.

Another problem we experience from ventilation is with the use of a Towable Aquatic Device (TAD) or what we commonly refer to in generic term as a ‘Rescue Board’. The more weight applied to the top of the rescue board forward surface, the more dead-rise against the bow will cause increased upward lift.

This is most noticeable when speeds increase or in rough water operations.

Our safety lies within our operational knowledge base. When we understand our pump efficiency and safety we can inspect, maintain and prevent further damages. It also helps us to determine when we have lost a pump or bearings to damage and need to ensure that we don’t stress the engine from overloading rpm.

Get to know your Rescue Water Craft. There is more to know than this story can tell. Start with the jet pump unit and review your owner’s manual for inspection tips. It really is the secret of our forward success!

Content Creator - Shawn Alladio cares most about her community and the culture surrounding the safety of event service providers and Rescue Water Craft operators, working hard and dedicated towards protecting their reputation, distributing safety information and continuing to train these amazing individuals to the highest standards of care.

Jet Pump

Personal Water Craft Impeller Inside the Jet Pump Casing

5 Ways to Ruin Your Rescue Water Craft without Even Riding

Know Your Boat

Do you have an owner’s manual for your Rescue Water Craft? Where is it?  When did you last pierce its pages of infinite wisdom to remind yourself how great a caretaker you are? How important is your mission? If you can read, you can maintain and every program needs a matching Original Equipment Manufacturer owner’s manual to the:

  1. Make
  2. Model
  3. Year of Production

FLUSH ME

Your Rescue Water Craft needs a drink too, it’s called a fresh water rinse. You need to wash the interior compartments (yes the engine compartment) and the exterior.

Then you most into the guts, the belly of the beast and it’s time to flush the water cooling exhaust system. You need a garden hose, perhaps some Salt Away® or Dawn Detergent drops and a few minutes of your time.

Corrosion can result from saltwater, brackish water from a lack of flushing the exhaust system. The salt crystals that remain when the water dries out can collect around fittings and elbow brass turns for the water lines and clog, reduce or restrict water flow. This can result in engine overheating or engine damage.

Fresh water engine exhaust flushing is just as important due to sediment or debris having the same negative effect internally.
So flush away and refer to your owner’s manual!

What can you do to comply?

  1. Review all of your log books.
  2. Be familiar with the checklists and complete all form fields.
  3. Make sure you understand how the checklists apply to the equipment you are using so your reviews are effective and not just a habit to fill in the blank.
  4. Inspect your PPE and remove it from service if needed.
  5. Be fearless in removing any gear or equipment from operational use with the control measures in place by your protocols and procedures.


PRACTICING EFFECTIVE BASICS

There is a time not to go. You may discover that you will have to take a RWC out of service and that coverage will be significantly reduced. Have a backup plan for downed equipment and make sure you have the budget to maintain efficient operations.
Checklist help insure your program. They are reminders of requirements that rely upon your mental and physical action. Practicing effective basics of the fundamentals will allow you to have the capability to catch mistakes before they become mishaps.

SPRAY ME
As if water wasn’t enough, you need to spray down all metal components of the interior of your craft with the recommended Original Equipment Manufacturer’s anti-corrosion spray. Don’t grab any item, some of them can ruin your bank account, or take your life!

Rubber can only have certain rust inhibitors spray on their surface otherwise they face cracking or blowing off under pressure from their connecting points resulting in a sunk Personal Water Craft. Boo Hoo! You don’t want to go to that party!

RWC Inspections

USMC 1996 Water Craft Preventative Maintenance

It'a all About Prevention for Rescue Water Craft Safety

LUBRICATE ME
Yes, rust and corrosion is looking for a place to set anchor. You need to know the periodic grease points that are required for your particular Rescue Water Craft. Use the recommended Marine Grade grease and follow up the hourly maintenance schedule on key points to keep your boat functional underway. Items that are moving parts are under a lot of stress, and even more stress when we use a Towable Aquaplane Device (TAD) known as a Rescue Board. The original trim design of Personal Water Craft are significantly offset in some use situations, so be good to your boat and it will be good to you!

INSPECT ME
Do you know what you are looking at? Do you have a complimentary post operations Rescue Water Craft check list you can evaluate the needs of your boat? Or are you just checking the little boxes so you can go home and close the doors?

Inspection means safety. Knowing what to look for, when to take a boat out of service for repair can stop the liability dragon.

FEED ME
When your program has no policy on preventative maintenance schedule, it’s only a matter of time! The chain reaction of causation is waiting to raise its hand. Your Rescue Water Craft Owner’s Manual should look worn and torn from repeated referencing. If its’ not, then you have problems and if you don’t have one, why not?

Feed the hand that feeds you. If your Rescue Water Craft program is lacking just these 5 simple steps, you do not have a marine unit, you have a disaster in the making.

• Grow your program by first securing an owner’s manual.
• Revise your checklist
• Ensure mandatory records are kept
• Adhere to the maintenance schedule
• Take a boat out of service when problems arise or are suspected

K38
Shawn Alladio – 1.12.2018

Shawn cares most about her community and the culture surrounding the safety of event service providers and Rescue Water Craft operators, working hard and dedicated towards protecting their reputation, distributing safety information and continuing to train these amazing individuals to the highest standards of care.

Speak Up Lives Depend On It

SPEAK UP AND ENDURE

  • It is unfair if an Operator is driving too fast for the conditions or over 25 mph during transits with persons on board.
  • It is unfair if a crewperson is not functional or operationally sound working on a rescue board.
  • It is unfair if a rescue board is not affixed to the stern deck of a Rescue Water Craft adequately. Notice I state ‘adequately’ as this a gray area dependent on many contributing factors.
  • It is unfair if a Rescue Water Craft is not operationally sound and still in service. Silence is admission.

Distractions can be numerous. Attention to situational awareness requires our focus. We must be vigilant as leaders in our full capabilities as operators and program managers.

Relationships are established through connectivity. This requires of us our effort of service and command. We must command our presence and be aware of fatigue, shortcomings and lack of preparation.

Rescue Water Craft Training for Night Qualification

Preparation

I have a saying ‘85% preparation and 15% underway time’. That is an honest assessment. It’s boring. Preparation is tedious and time consuming. Too often responders focus on the recovery and forget the mission workup. This includes electronics, trailers, rigging, rescue boards, PPE, and all accessary gear and parts.

We all need a foundation to rely upon. This means our fundamental core values are our continuing strength. Speak up when you know something is not working properly.

‘Back to the Basics’ is a long standing catch phrase of reason, let’s keep that in mind and not be distracted from normal operations.
The pre-operations checklists and logs that go into your program docket are what will keep your program regulated. It helps to discover potential problems or shortcomings that will lead up to a mishap and hopefully these evaluations are conducted prior to an accident or serious injury.

Operations of normal standard behaviors should not be dismissed or ignored. Adhering to the basics will ensure program longevity. We cannot afford the penalties of reality when it suddenly gets real and we discover we should have done that, dismissed doing that, or ignored doing that because we could.

But we shouldn’t. Speak Up. We should be held accountable. Liability is a serious reminder of competency.

Rescue Board Training and Inspection

What can you do to comply?

  1. Review all of your log books.
  2. Be familiar with the checklists and complete all form fields.
  3. Make sure you understand how the checklists apply to the equipment you are using so your reviews are effective and not just a habit to fill in the blank.
  4. Inspect your PPE and remove it from service if needed.
  5. Be fearless in removing any gear or equipment from operational use with the control measures in place by your protocols and procedures.

Practicing effective basics

There is a time not to go. You may discover that you will have to take a RWC out of service and that coverage will be significantly reduced. Have a backup plan for downed equipment and make sure you have the budget to maintain efficient operations.

Checklist help insure your program. They are reminders of requirements that rely upon your mental and physical action. Practicing effective basics of the fundamentals will allow you to have the capability to catch mistakes before they become mishaps.

Content Creator - Shawn Alladio cares most about her community and the culture surrounding the safety of event service providers and Rescue Water Craft operators, working hard and dedicated towards protecting their reputation, distributing safety information and continuing to train these amazing individuals to the highest standards of care.

Document Your RWC Program Results